Chapter 3 - Setting up the software
Bjarne Stroustrup (C++ creator)
Getting your AI video system ready is as enjoyable as assembling a high-performance racing car: each component matters, but with the right sequence, the process is straightforward, and the results are exhilarating. With a few key installations and configurations, your system can go from a blank slate to a fully capable AI video engine, ready to turn ideas into stunning videos.
The AI video software stack is built in layers, each one powering the next. At the base is your operating system, optimized to communicate with your GPU. Then comes the CUDA framework, which lets your GPU crunch numbers at incredible speeds. Next, Python is responsible for running AI models without conflicts. On top of that, you install AI video models and a workflow manager called ComfyUI. Finally, a management layer called Videcool makes controlling the system simple, letting you focus on creativity instead of technical hurdles.
If you don’t have a powerful GPU, there’s a way to get started quickly. A lightweight setup, using a tool called Wan2GP, simplifies installation and lets you start generating AI videos right away.
By the end of this chapter, after installing all the software, you’ll have a system that feels powerful, responsive, and ready to bring your AI video ideas to life.
The software stack for AI video creators
The software stack for AI video creators forms the backbone of any efficient video generation system. Each layer from the operating system up to the management interface, plays a critical role in ensuring that AI models run smoothly, utilize GPU resources effectively, and produce high-quality videos.
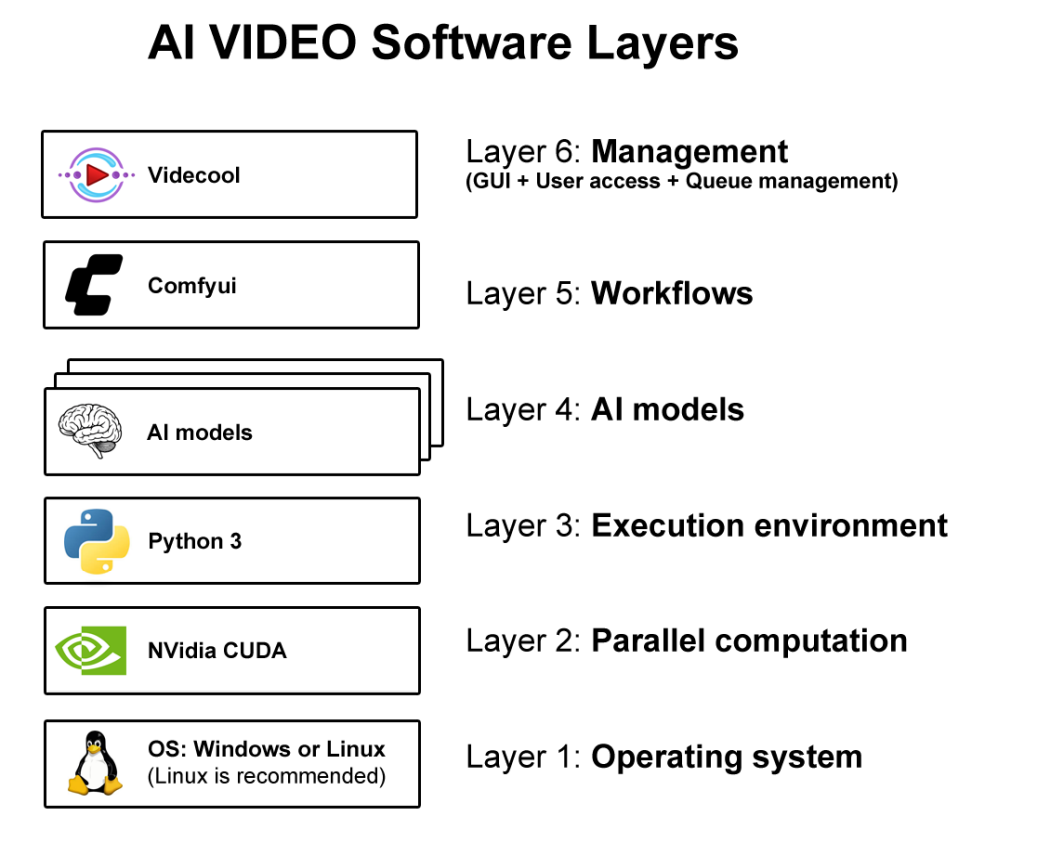
Layer 1 – OS layer
At the very bottom sits the operating system, either Windows or Linux. Most AI video models require libraries that are only available on Linux, so it is the best option. For Windows users, the Windows Subsystem for Linux (WSL) is the recommended platform. For dedicated video systems, Linux gives the user leaner installs, lower latency disk access, and freedom to strip away every service that is not video-related. On the other hand, Windows supplies a friendlier GUI based environment. Either way, the NVIDIA GPU needs to be made accessible to the higher layers. To setup the OS layer, you need to download and install Ubuntu Linux and the NVIDIA GPU drivers.
Download Ubuntu Linux:
Download NVIDIA GPU Drivers:
https://www.nvidia.com/en-us/drivers/
Layer 2 – Parallel Computation layer
Once the OS and the GPU drivers are installed, you need to install the NVIDIA CUDA framework, which will serve as your parallel computation environment. CUDA is the lingua franca for raw AI Math. This layer decides how many SMs (streaming multiprocessors) are kept busy, how GPU memory is managed, and how computations are handled [1]. You can download and install the CUDA framework from the following URL:
Download CUDA:
https://developer.nvidia.com/cuda-downloads
Layer 3 – Execution environment
Python is the programming language of AI [2]. To run AI video models, you need to setup Python 3. Since different AI models will use different versions of Python 3, a tool called Anaconda is also required to manage virtual Python environments. Anaconda environments isolate conflicting binary packages, so that one model’s code does not break another’s.
Download Python 3 on Ubuntu Linux:
sudo add-apt-repository ppa:deadsnakes/ppa
sudo apt update & sudo apt install python3.11
Download Python 3 on Windows:
https://www.python.org/downloads/windows/
Download Anaconda:
https://www.anaconda.com/download
Layer 4 – AI Video Models
Once your Python and Anaconda environment is prepared, you can download AI video models. AI video models can be downloaded from GitHub and Huggingface. On Huggingface, each model has a short description called a model card that gives you the steps for installation.
Download AI video models from Huggingface:
Download AI video models from Github:
Layer 5 – Workflows managed by ComfyUI
AI video professionals set up workflows manually (or automatically [3]) using ComfyUI to have precise control over the videos they create. A workflow consists of nodes, that perform actions on each video frame. ComfyUI can be pictured as a software that turns AI models into reproducible workflows.
Download ComfyUI:
https://www.comfy.org/download
Layer 6 – Management (Videcool)
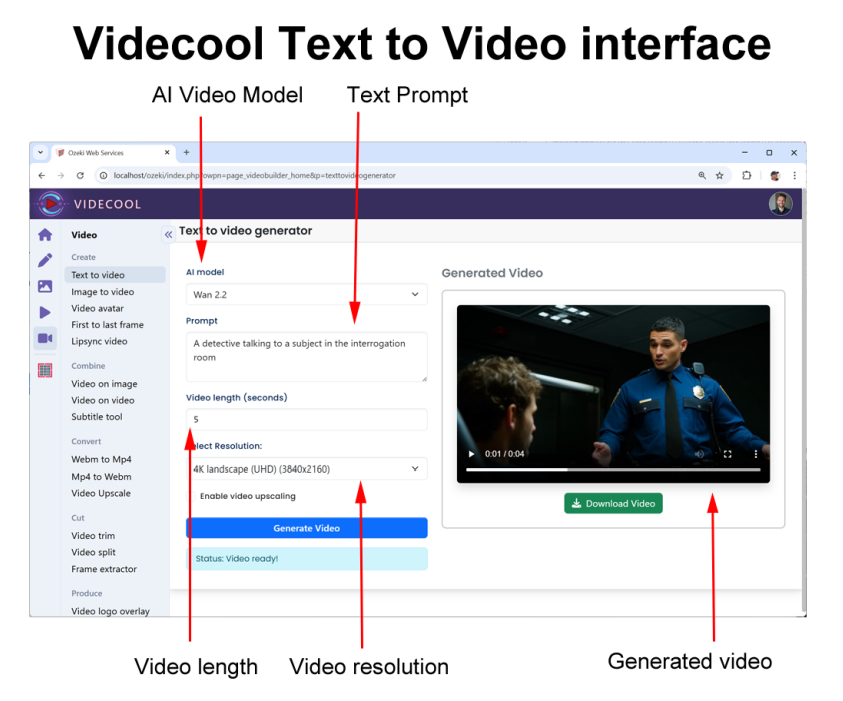
At the top of the software stack is the Videcool software. Videcool forms the management layer. It is responsible for providing an easy-to-use web-browser-based user interface for Video creators; it manages multi-user access and makes sure GPU resources are allocated properly to users. Videcool makes it possible to add / remove video creation jobs to and from a queue. It also allows you to track video generation progress, to manage user access and GPU resource allocation. Thanks to Videcool video creators do not have to work with complex ComfyUI workflows, they can simply create videos by entering a prompt.
Download Videcool:
The software stack for beginners
If you find the software stack explained in this chapter too complicated, you can start with a simpler setup. The software stack for beginners can be used for entry-level systems. This is also the stack to install if you lack GPU power.
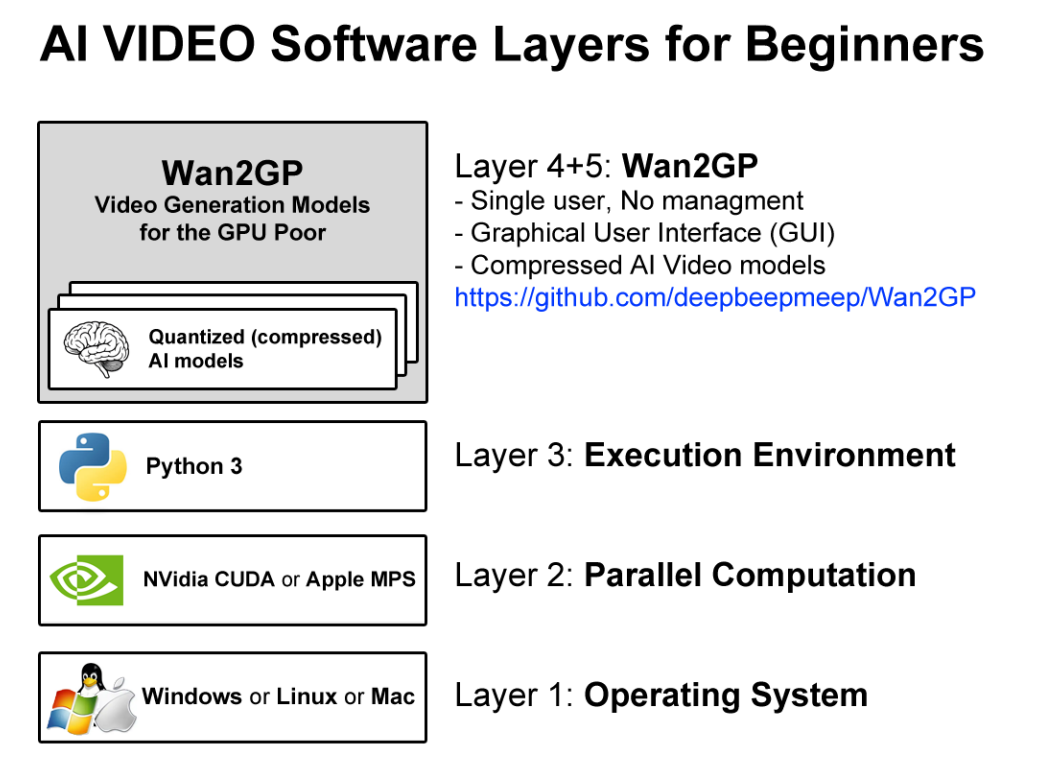
Wan2GP
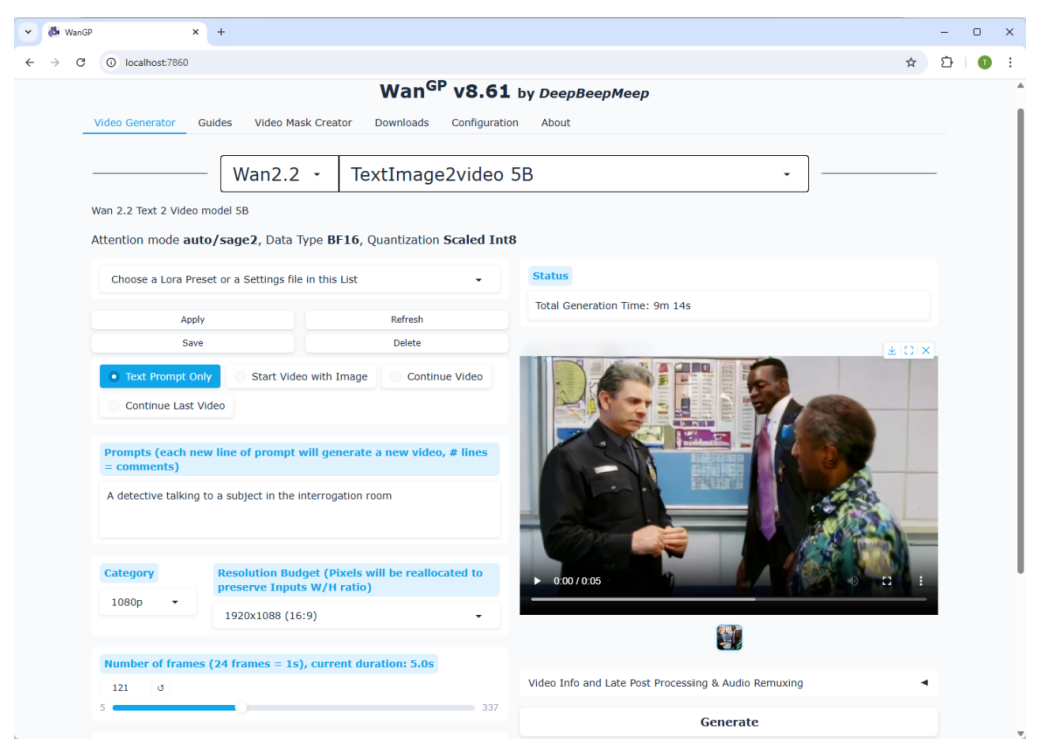
Wan2GP is an open-source software project for AI video generation, aimed specifically at people who don’t have very powerful GPUs (i.e. “GP = GPU poor”). This software simplifies the installation process because after setting up the operating system, the CUDA libraries and Python, the user can simply install Wan2GP. After installation the user is ready to create AI videos on the PC without any further steps of configuration.
Download Wan2GP:
https://github.com/deepbeepmeep/Wan2GP
The Wan2GP user interface is easy to use and is fit for single user access. The AI video models included are compressed to make them fit into smaller GPUs. This compression results in poorer quality, but offers faster execution.
Wan2GP can be installed on Windows, Linux and Mac. On Windows and Linux, it uses the CUDA framework as the base layer, on Mac it uses the Apple Metal Performance Shaders (MPS) library.