Chapter 4 - How to create an AI video
Albert Einstein
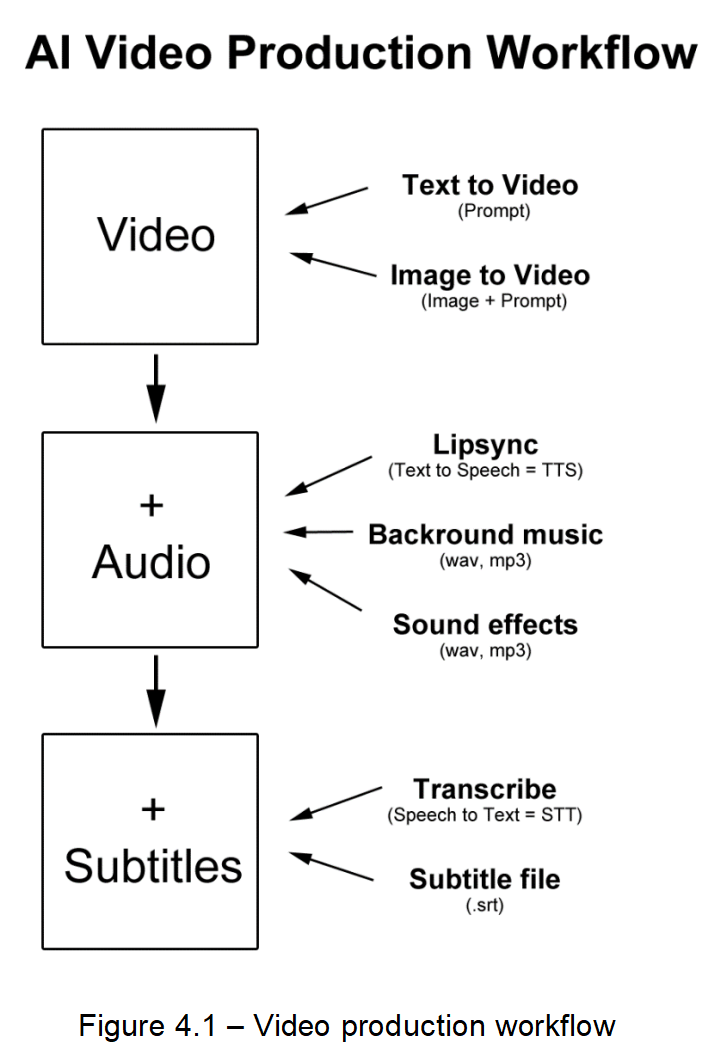
Once your system is ready for AI video creation, you can get to work. The AI video production workflow begins with creating the visual content itself. This can be achieved in two main ways: text-to-video [4] and image-to-video [5]. With text-to-video, you provide a written prompt describing what you want to see, and the AI generates moving visuals directly from that description. Image-to-video, on the other hand, uses a still image along with a guiding prompt to animate or expand the scene into a full video sequence. These methods allow creators to quickly generate dynamic visuals without traditional cameras or film crews, making video creation accessible to anyone with a clear idea and the right tools.
Once the video is generated, the next step is enhancing it with audio. This involves multiple elements working together. AI-driven lip-syncing [6] [7] aligns character mouth movements with voiceovers created through text-to-speech (TTS) systems, making characters appear more lifelike. At the same time, background music can be generated [8] or added in formats such as WAV or MP3 to set the emotional tone, while sound effects, which can be also generated [9] contribute to realism and engagement. These audio layers are essential, because they give depth to the visuals, transforming raw videos into polished and immersive viewing experiences.
The final stage of the workflow is adding subtitles, which improves accessibility and viewer comprehension. Using speech-to-text (STT) technology [10], the spoken dialogue in the video is automatically transcribed into written form. This transcription is then formatted into a subtitle file (.srt), which can be embedded into the video or offered as a separate download.
Together, these three stages (video generation, audio integration, and subtitle creation) form the AI Video Production Workflow.
How to make your first AI video clip
As mentioned earlier, there are two primary ways to create AI videos: text to video and image to video. Both approaches use artificial intelligence to generate short clips, but they differ in how the starting point is defined. Text to video begins purely from a written prompt, while image to video uses an existing picture as the foundation. These methods can also be combined in sequence to build longer videos with continuity.
In text to video, the process starts with nothing but a description of the scene or action you want to generate. The AI interprets this text and creates a short video clip, usually around 5–10 seconds long. This is a good way to establish the opening visuals of a video, since you can describe the setting, characters, or overall mood directly.
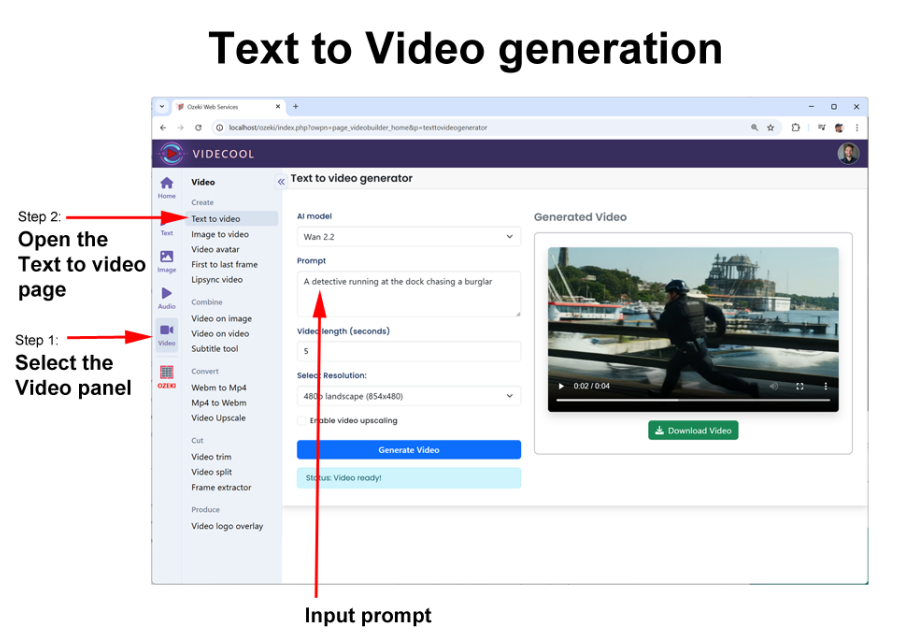
To create a video from a text prompt, open the Videcool user interface in your browser, and simply enter your text prompt in the “Video / Text to video” page.
In image to video, the workflow is anchored by a still frame. You provide an image, either one you designed or the last frame of a previous clip, along with a guiding prompt that explains what should happen next. The AI then animates the image following the instructions.
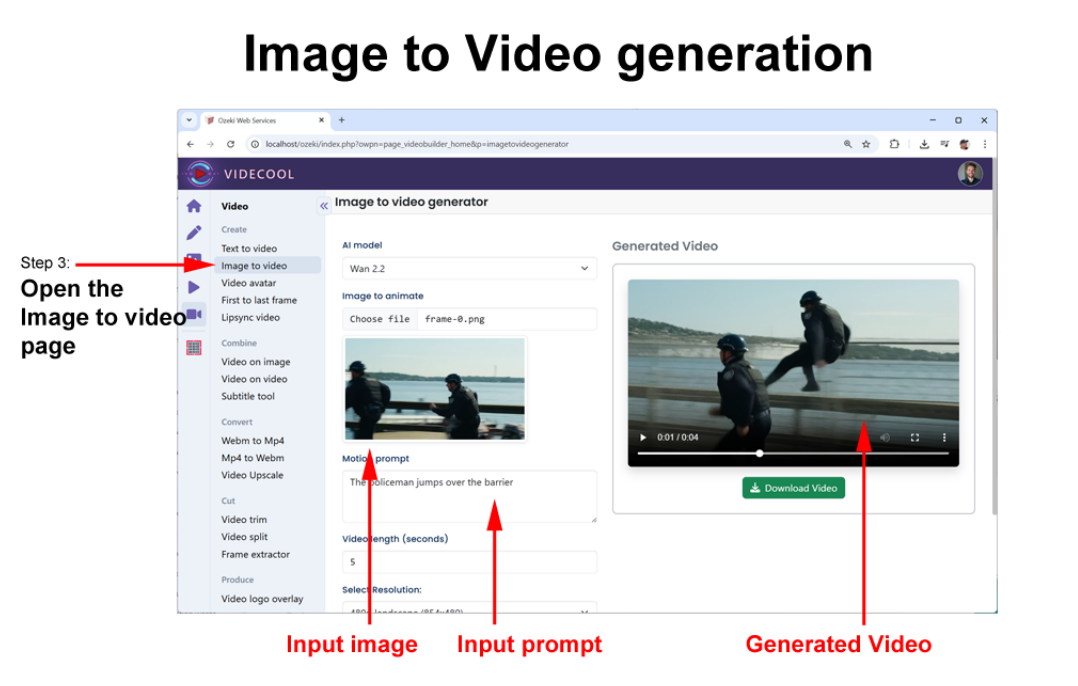
To get started with your first AI video clip, try a simple text-to-video. Once generated, export the final frame as an image and use it as the base for an image-to-video extension. This chaining technique ensures smooth transitions and helps you craft a cohesive 30–60 second clip in just a few minutes.
How to make longer videos
AI video generation models usually have a limitation: they can only produce short clips, typically around 5-10 seconds long even though various methods are discussed in the scientific community for long video generation [11]. This means that if you want to create a longer video, you can’t generate it all at once, you need to extend it piece by piece. To do this smoothly, every new segment requires a guiding prompt that tells the AI what should happen next, so the video continues naturally instead of looking like separate, disconnected clips.
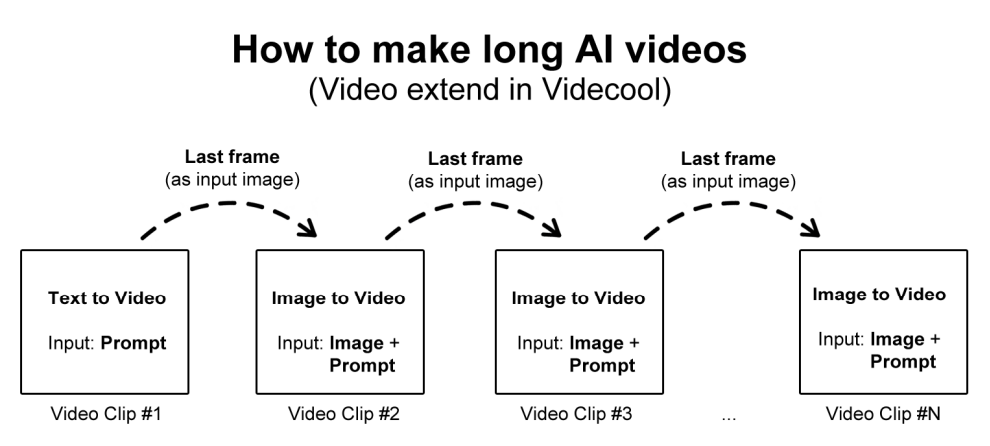
The process is called chaining. It starts with a Text-to-Video generation, where you provide an initial prompt. The AI uses the prompt to create the first short video clip. Once that clip is complete, the last frame of the video is extracted and used as the starting point for the next segment. This ensures that the transition between clips looks seamless and consistent, instead of jumping to something entirely new.
For each new clip, the workflow switches to Image-to-Video generation. The input is both the last frame (acting as the "anchor image") and a new guiding prompt that describes how the video should progress. This is repeated again and again, feeding the last frame forward and adding updated prompts, until you’ve chained enough clips together to form a long AI-generated video. Essentially, this method allows you to bypass the short-clip limit by extending the video clip by clip.
How to achieve character consistency across scenes
Longer AI videos require character consistency. This is best done in two steps. The first step focuses on AI text to image generation [12], where the process begins by creating a base character image using a text-to-image model. Once the initial character image is established, multiple variations are produced through AI image editing [13]. These edits are guided by specific prompts, ensuring that while new images are created for different scenes or poses, the character’s identity and style remain consistent across all of them.
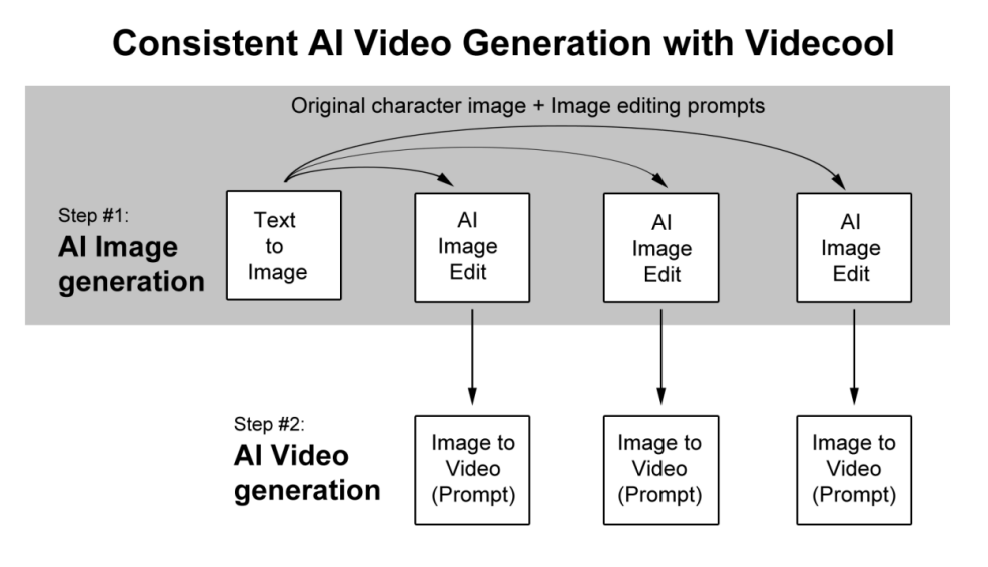
The second step transitions into AI video generation. Each edited image from step one serves as an anchor image input for an image-to-video model. By attaching prompts to these inputs, the system generates short video sequences that smoothly animate the character while preserving its core features. This ensures the resulting videos are both dynamic and visually coherent, since they are grounded in the edited keyframes rather than starting from scratch each time.
To try this method, open the Image edit feature of Videcool and create a character using the text to image feature, then put this character into various scenarios.
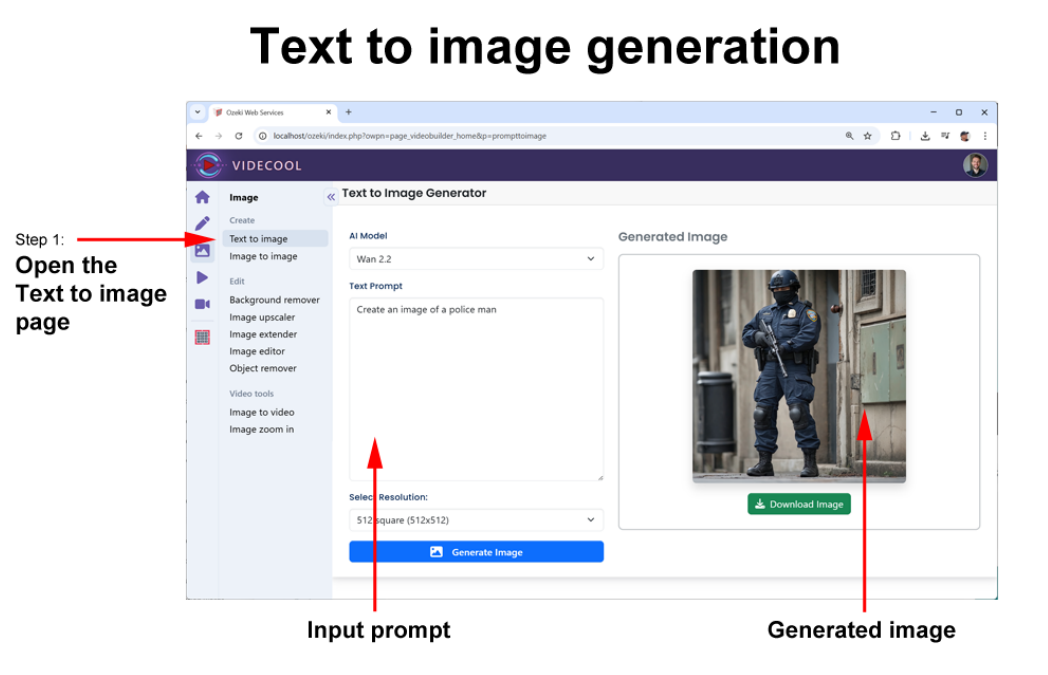
Text to image prompt: “Create the image of a policeman”
In a real-life video, your prompt will be much longer. You should add camera instructions, lighting, color tone and other refinements to the prompt. See Chapter 6-16 for the possible keywords you can use to enhance the original prompt.
Once the text to image process created the characters, you can use image to image generation to put them in various environments.
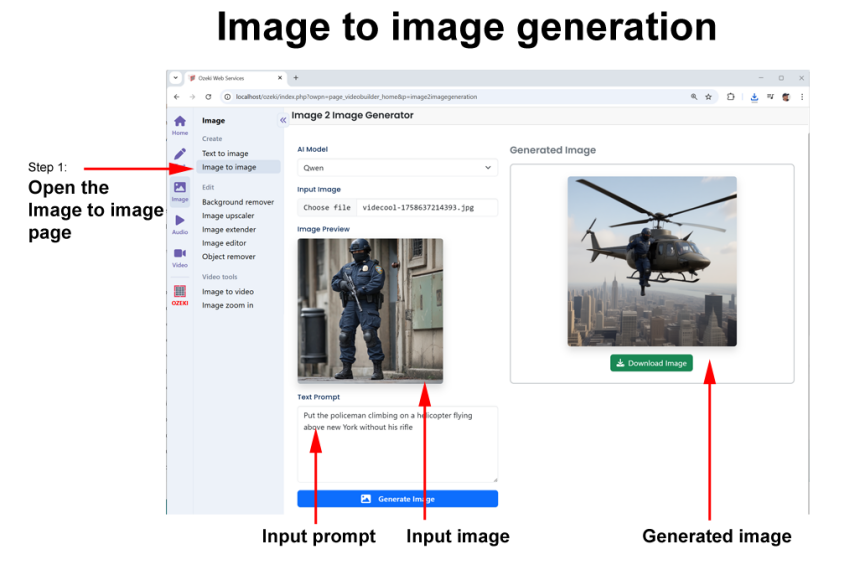
Image edit prompt 1: “Put the policeman in the cockpit of a helicopter flying above New York”
This edited image establishes the character in a new, dynamic scenario while keeping their defining features intact. Notice how details like uniform, facial structure, and posture remain consistent with the original text-to-image output. By carefully crafting the image-to-image prompt, you guide the AI to adapt the character to a completely different setting: the helicopter cockpit; without altering their identity. This process can be repeated for each subsequent keyframe, allowing you to place the same character in multiple locations or actions while maintaining visual continuity throughout your video. The more precise your prompts are regarding environment, perspective, and mood, the more coherent the character’s appearance will be across all generated scenes.
For example, in the next keyframe, the character can be placed on a bridge in mid-run, introducing motion and a new perspective while retaining the core visual traits established in the original image. The AI ensures that the policeman’s uniform, facial features, and body proportions remain consistent, even as the environment and action change. If you would refine your prompt further by specifying the setting and activity more precisely, you may provide the AI with even more clear guidance on how to adapt the character naturally to this scene. This step reinforces character continuity across scenes, which is crucial for creating seamless transitions when generating the long video sequences.
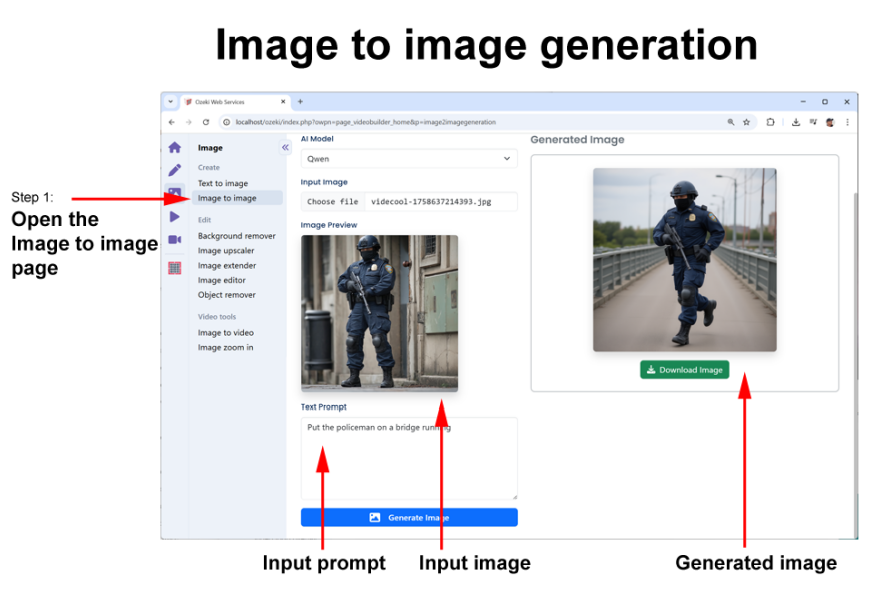
The following prompt was used to generate the above key frame:
Image to image prompt 2: “Put the policeman on a bridge running”
In the third keyframe, the policeman is positioned in a forest, aiming his rifle, introducing a completely different environment and action while maintaining the character’s defining traits. Despite the shift in background, pose, and mood, the AI preserves key features such as facial structure, uniform details, and overall style, ensuring visual consistency with the previous frames. Including specific instructions about the setting, lighting, and posture in the prompt you can instruct the AI to translate the character into this new scenario in a more controlled way. Careful attention to detail across multiple keyframes is essential for creating a coherent and believable video sequence where the character remains instantly recognizable throughout.
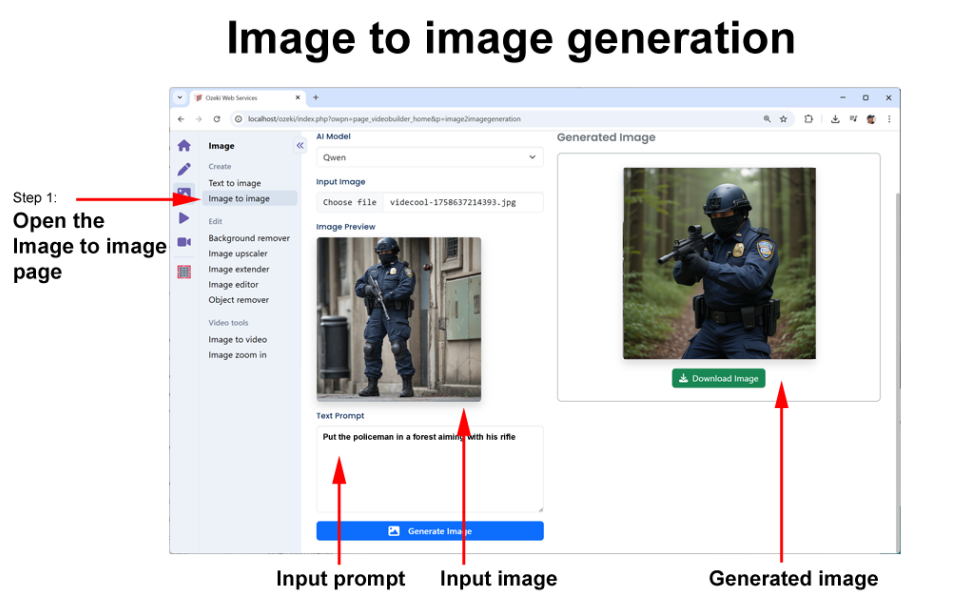
Image to image prompt 3: “Put the policeman in a forest aiming his rifle”
Once all the images were generated using the AI image to image model, you can start to add motion to them using the image to video functionality. Each keyframe acts as a reference point, allowing the AI to interpolate movement between frames while keeping the character consistent. This approach ensures that the final video flows smoothly and the transitions between different actions and environments feel natural.
Note that you don’t have to generate your images in order, you can simply generate images for various scene ideas and arrange them in order once you see them.
Once your images are ready you can start the AI video generation. This can be illustrated by substituting the previously generated images into Figure 4.5. If you take a look at Figure 4.10 you can get a better understanding of the how a long video can be built using key frames.
![]()
How to refine your prompt
When you use text to video to generate your first clip, you will often improve your prompt step by step to get the video you prefer. Most video services will frustrate you, because every video you generate will be completely different.
To overcome this problem, Videocool introduces the “Seed” parameter. In the next paragraph, you will learn how you can use the “Seed” parameter to lock your image or video, and to be able to refine your prompt.
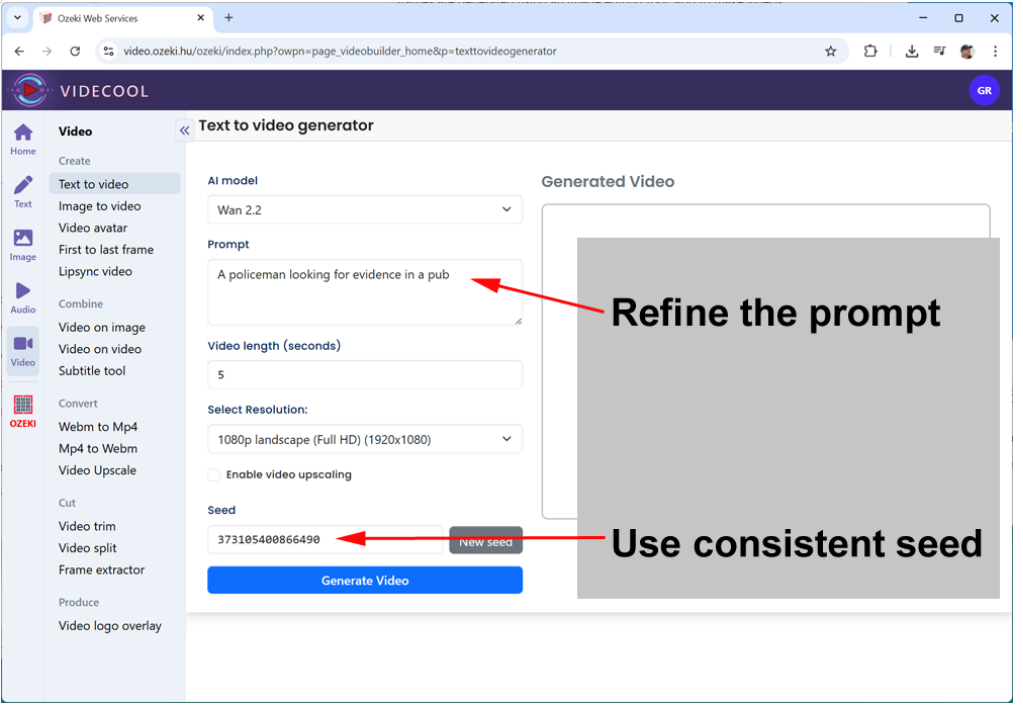
Text to image and text to video generation work by starting with random noise and gradually shaping it into an image or video based on the instructions given in the text prompt. This random noise isn’t truly chaotic, it’s determined by a seed value, which acts like the starting point for the AI’s creative process. If you change the seed, the AI will begin from a different noise pattern, which often leads to a completely different video output, even when using the same prompt.
Because of this, when you want to refine or improve a prompt, it is important to keep the seed the same. By reusing the same seed, you can keep the starting noise pattern the same, so the AI only responds to the changes in your wording rather than producing a new and unrelated video. This makes it easier to iterate and fine-tune your prompt until you get the results you are looking for, while still maintaining consistency in the generated visuals.
An example of prompt refinement
Initial prompt:
Create the image of a policeman
Add a location:
Create the image of a policeman on a New York street
Add a camera angle:
Create the image of a policeman on a New York street, low camera angle
Add lighting:
Create the image of a policeman on a New York street, low camera angle,
cinematic close-up, hard light at 45° creating deep shadows on face
Add time of day:
Create the image of a policeman on a New York street at midnight, low
camera angle, cinematic close-up, hard light at 45° creating deep shadows on face
Add character emotion:
Create the image of an angry policeman on a New York street at midnight,
low camera angle, cinematic close-up, hard light at 45° creating deep shadows on face
Add character motion:
Create the image of an angry policeman on a New York street raising a
gun at midnight, low camera angle, cinematic close-up, hard light
at 45° creating deep shadows on face